
Chimney Flashing Repair in Minnesota: Roof-Junction Leak Evaluation & Repair
CHIMNEY CRICKETS • CHIMNEY FLASHING EVALUATION & REPAIR
Chimney flashing repair in Minnesota addresses one of the most common and most complex water-entry points on any home — the junction where the chimney passes through the roof. When flashing separates, corrodes, cracks or fails, water can enter the building at the roofline and cause damage to framing, insulation, ceilings, walls and the chimney itself.
Chimney Crickets helps homeowners across Minneapolis, Bloomington and the South Metro evaluate the flashing system, trace the water path and repair or replace the specific components that are allowing water to enter — rather than applying a surface seal over undiagnosed failure.
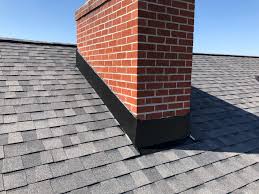
Condition-Based Evaluation
Flashing repair recommendations begin with the homeowner’s water symptoms and a systematic evaluation of the flashing system, adjacent roofing, chimney masonry and related components. Chimney Crickets identifies where the flashing has failed before selecting the repair method.
Minnesota Weather Awareness
Minnesota’s freeze-thaw cycling, ice, snow accumulation, wind-driven rain and thermal expansion stress chimney flashing systems more aggressively than in milder climates. Repair planning accounts for these conditions.
Clear Next Steps
Chimney Crickets explains which flashing components have failed, how water is entering, what repair is recommended and whether related crown, cap, masonry or roofing service should also be considered.
What Is Chimney Flashing?
Chimney flashing is the system of metal pieces and sealant that waterproofs the junction where the chimney passes through the roof. Its sole purpose is to prevent water from entering the building at the gap between the chimney structure and the roof surface.
Without functional flashing, every rainstorm, snow melt and wind-driven precipitation event would drive water directly into the gap between the chimney and the roof — reaching framing, sheathing, insulation and interior surfaces.
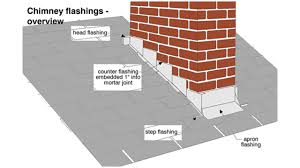
Chimney flashing is not a single piece of metal. It is a multi-component system that includes step flashing, counter flashing, base flashing, sealant and sometimes a chimney cricket — all working together to manage water at different points around the chimney perimeter.
Types of Chimney Flashing Materials
Chimney flashing is available in several materials. The type affects durability, corrosion resistance, repairability, cost and compatibility with the roof and chimney.
| Material | Characteristics |
|---|---|
| Aluminum | Lightweight, affordable, widely available; may corrode in contact with masonry mortar or dissimilar metals; shorter lifespan than copper or stainless steel |
| Galvanized Steel | Common on older installations; the zinc coating provides corrosion resistance but may fail over time, allowing rust |
| Copper | Highly durable, corrosion-resistant and long-lasting; develops a green patina; more expensive than aluminum or galvanized steel |
| Lead | Traditionally used for counter flashing because it is malleable and can be pressed into mortar joints; durable but heavy; may require environmental considerations |
| Stainless Steel | Corrosion-resistant and durable; used in some professional flashing systems; more expensive than galvanized or aluminum |
| Rubber or Synthetic | Used in some manufactured flashing boots and membranes; not appropriate for all chimney configurations; may degrade from UV exposure |
The correct material choice depends on the existing flashing, roof type, chimney construction, code requirements, budget and expected service life.
How Chimney Flashing Works
The chimney-roof junction is not flat or simple. The chimney is a vertical masonry or framed structure penetrating a sloped roof surface. Water arriving from the uphill side must be diverted around the chimney, and water arriving from above must be directed onto the roof without entering the gap.
Chimney flashing manages this by creating an overlapping, layered barrier:
Step Flashing (Roof Side)
Individual L-shaped metal pieces are woven into the shingle courses along the sides of the chimney. Each piece overlaps the one below it, creating a stair-step water barrier that directs water onto the next shingle rather than behind the roofing.
Counter Flashing (Chimney Side)
A continuous or sectioned metal piece is embedded in or sealed against the chimney masonry and folds down over the top edge of the step flashing. Counter flashing prevents water from running behind the step flashing.
Base Flashing (Front and Rear)
Metal pieces at the front (downhill) and rear (uphill) of the chimney direct water away from the chimney base. The rear base flashing may connect to a chimney cricket (saddle) on wider chimneys.
Sealant
Masonry sealant, roofing sealant or mechanical fasteners secure the counter flashing to the chimney. Over time, sealant hardens, cracks and separates — becoming one of the most common failure points in the flashing system.
Chimney Cricket (Saddle)
A small peaked structure built on the uphill side of wider chimneys that diverts water and debris around the chimney rather than allowing it to accumulate at the rear base. A missing or damaged cricket can concentrate water against the chimney’s most vulnerable junction.
Key principle: Flashing works through gravity and overlap — each component directs water onto the one below it, ultimately delivering water onto the roof surface rather than allowing it behind the roofing or against the chimney.
Signs Chimney Flashing May Need Repair
Flashing problems are frequently invisible from the ground. Many failures occur at concealed joints, embedded edges and overlapped surfaces that cannot be inspected without roof access.
The following symptoms may indicate a flashing concern, but each can have more than one possible source. Professional evaluation determines whether flashing, the crown, the cap, masonry or a combination is involved.
Ceiling or Wall Stains Near the Chimney
Water stains on the ceiling or interior wall adjacent to the chimney — especially on the uphill or side walls — are one of the most common indicators of flashing failure. The stain location may not correspond directly to the entry point because water can travel along framing before becoming visible.
Visible Rust on Flashing Metal
Rust, corrosion, pitting or deteriorated metal edges visible on the flashing from the ground or roof indicate that the protective coating has failed and the metal may no longer be preventing water entry.
Lifted, Bent or Separated Metal Edges
Counter flashing that has pulled away from the chimney, step flashing that has shifted, or metal edges that are bent, lifted or visibly separated indicate that the flashing is no longer sealed against the chimney or roofing.
Failed, Cracked or Missing Sealant
Sealant that has hardened, cracked, separated, turned white or is missing along the counter-flashing-to-masonry connection is one of the earliest and most common flashing failure points. In Minnesota, thermal cycling accelerates sealant deterioration.
Visible Gaps at the Roofline
Any visible gap, daylight or opening where the chimney meets the roof indicates that the flashing system is not performing its intended function.
Leaks During or After Wind-Driven Rain
Leaks that appear specifically during wind-driven rain — but not necessarily during calm, vertical rain — may indicate flashing failure on the windward side of the chimney, where horizontal precipitation is forced behind lifted edges or into open joints.
Leaks During Snow Melt or Ice-Dam Conditions
In Minnesota, ice dams can form at the chimney base. Melt water from ice-dam conditions may be forced behind flashing and under shingles in ways that normal rain does not produce.
Water Stains Appearing at the Ceiling-to-Wall Junction
Water entering at the flashing level may travel along the top plate, rafters or ceiling joists before becoming visible at a ceiling-to-wall corner — sometimes several feet from the chimney itself.
Deteriorating Mortar Around Counter-Flashing Reglets
If the mortar joint where counter flashing is embedded is cracked, missing or deteriorated, water may enter behind the counter flashing and reach the step flashing, sheathing and framing below.
Recent Roofing Work That Did Not Address the Flashing
New shingles installed without replacing or properly integrating the chimney flashing may produce leaks that appear shortly after the roofing project. The new shingles may be fine while the original flashing continues to fail.
Important: Flashing failure is often gradual. Homeowners may notice a minor stain during one storm, then no symptoms for months, then worsening stains the following season. Intermittent symptoms do not mean the problem has resolved — they may indicate that the failure is directional, wind-dependent or seasonal.
What Causes Chimney Flashing to Fail?
Chimney flashing fails for several interconnected reasons. In Minnesota, weather-related factors significantly accelerate the process.
Sealant Deterioration
Masonry sealant and roofing sealant used to secure counter flashing eventually hardens, loses flexibility, cracks and separates from the chimney surface. Thermal cycling, UV radiation and moisture exposure accelerate this process. In Minnesota, sealant may fail faster than in milder climates because of the extreme temperature range.
Thermal Expansion and Contraction
Metal flashing, chimney masonry and roof sheathing expand and contract at different rates as temperatures change. In Minnesota, where seasonal temperatures can swing more than 100°F, this differential movement stresses every joint, overlap and seal in the flashing system — progressively loosening connections.
Corrosion and Rust
Aluminum, galvanized steel and other flashing metals may corrode when exposed to moisture, salt, alkaline mortar contact or galvanic reaction with dissimilar metals. Once the protective coating fails, rust compromises the metal’s integrity and allows water penetration.
Ice and Snow Stress
Heavy snow loads, ice formation and ice-dam conditions at the chimney base may physically displace flashing, bend metal edges, crack sealant and force water behind components that are weather-tight under normal rain conditions.
Wind Damage
Strong wind, storm events and wind-driven debris can lift flashing edges, separate counter flashing from masonry and bend step flashing away from shingle courses.
Improper Original Installation
Flashing that was improperly installed — using insufficient overlap, wrong materials, inadequate sealant, improper integration with shingles or missing components — may fail prematurely regardless of weather exposure.
Roofing Replacement Without Flashing Replacement
When a roof is replaced, the chimney flashing should be evaluated and replaced or properly integrated with the new roofing. Reusing old flashing with new shingles is a common source of subsequent leaks.
Masonry Deterioration Beneath the Flashing
If the mortar joint holding the counter flashing deteriorates, the flashing loses its anchor point and may separate from the chimney. Masonry repointing may be needed alongside flashing repair.
Chimney Settlement or Movement
If the chimney settles, shifts or moves relative to the roof structure, the flashing connection may be stressed, separated or torn — creating gaps that allow water entry.
Age
Every flashing component has a finite service life. Even well-installed flashing will eventually require maintenance, re-sealing or replacement as materials age and weather exposure accumulates.
Why Chimney Flashing Repair in Minnesota Is Different
Minnesota places extreme demands on chimney flashing systems that milder climates do not.
Minnesota-specific flashing stressors
- Temperature range exceeding 100°F between summer highs and winter lows creates cumulative thermal-cycling stress on every joint and seal
- 50+ freeze-thaw cycles per year may crack sealant, displace metal and widen gaps at the chimney-roof junction
- Heavy seasonal snowfall means flashing may sit beneath accumulated snow and ice for extended periods
- Ice dams at the chimney base force melt water behind flashing and under shingles in ways that rain alone does not
- Wind-driven precipitation forces water behind lifted edges and into open joints from angles that vertical rain does not reach
- Spring and fall wet periods create sustained moisture contact at the flashing junction before and after freeze seasons
- UV and solar radiation degrade sealant, accelerate metal oxidation and stress surface coatings
What this means for flashing repair
In Minnesota, chimney flashing repair must account for:
- Materials that can withstand the full seasonal temperature range
- Sealant rated for freeze-thaw and thermal cycling
- Proper overlap and integration that resists wind-driven moisture
- Ice-dam potential and the need for adequate clearance and drainage
- Snow-load stress on flashing edges and connections
- Whether a chimney cricket is needed to divert water on wider chimneys
Chimney Flashing Repair Options
The correct approach depends on the type of failure, the extent of damage, the flashing material, the roof type and whether the chimney masonry is also involved.
Sealant Replacement
If the counter-flashing sealant has failed but the metal and masonry connection remain sound, removing the old sealant and applying a new, flexible, weather-rated sealant may restore the seal. This is the most focused and least invasive flashing repair.
However, sealant replacement is appropriate only when the metal itself, the reglet (embedded joint) and the step flashing are all in acceptable condition. Re-sealing over corroded metal or separated components does not address the underlying failure.
Counter-Flashing Repair
If counter flashing has separated from the chimney, shifted, bent or partially failed, the affected sections may be re-seated, re-secured and re-sealed into the masonry joint. The mortar around the reglet may need to be repaired before the counter flashing can be properly re-embedded.
Step-Flashing Repair or Replacement
If individual step-flashing pieces have shifted, corroded or lost their integration with the shingle courses, the affected pieces may need to be replaced and properly woven back into the roofing. This may require lifting adjacent shingles.
Full Flashing Replacement
When the flashing system has failed broadly — through widespread corrosion, extensive separation, storm damage, age or improper original installation — complete removal and replacement of the step flashing, counter flashing and base flashing may be necessary.
Full replacement provides the opportunity to:
- Install properly sized and overlapped components
- Use appropriate materials for the chimney and roof type
- Integrate new flashing with existing or new roofing
- Address mortar-joint conditions at the counter-flashing reglets
- Install or repair the chimney cricket if needed
Chimney Cricket Installation or Repair
If a chimney cricket is missing, undersized or damaged on the uphill side of the chimney, water may accumulate against the rear base flashing rather than being diverted around the chimney. Cricket installation or repair may be recommended as part of the flashing scope.
Masonry Repointing at the Flashing Line
If the mortar joints where counter flashing is embedded have deteriorated, the mortar should be repaired to provide a sound anchor for the re-seated or new counter flashing. Flashing repair without addressing deteriorated mortar may result in early re-failure.
Coordinated Roof and Chimney Work
When a roof is being replaced or repaired near the chimney, coordinating flashing replacement with the roofing project is the most effective approach. The chimney-side components (counter flashing, masonry joints, crown, cap) should be evaluated at the same time.
Related Component Repair
If the flashing evaluation reveals crown cracks, cap failure, masonry deterioration, open mortar joints or porous brick — all of which may contribute to water entry near the flashing area — those conditions should be addressed as part of a complete repair scope.
How Chimney Flashing Repair in Minnesota Works
Step 1
Describe the Water Symptoms
Contact Chimney Crickets and describe what you have observed. Helpful information includes:
- Property address in Minneapolis, Bloomington or the South Metro
- Location of interior water stains — ceiling, wall, corner, firebox
- When leaks appear — during rain, after wind-driven rain, during snow melt, after storms
- Whether the symptoms are new, recurring or worsening
- Visible flashing damage — rust, separation, gaps, lifted metal, missing sealant
- Recent roofing work near the chimney
- Visible chimney damage — crown cracks, missing cap, deteriorated masonry
- Chimney and fireplace type
- Known previous flashing repairs
- Whether the property is being purchased or sold
Step 2
Evaluate the Flashing System
Chimney Crickets evaluates the flashing system from an appropriate access point — not from the ground alone.
Flashing evaluation includes:
- Counter-flashing attachment, sealant condition and metal integrity
- Step-flashing position, overlap and integration with shingle courses
- Base-flashing condition at the front and rear of the chimney
- Chimney cricket presence, condition and adequacy
- Mortar condition at counter-flashing reglets
- Metal corrosion, rust, perforation and edge integrity
- Visible gaps, separations or daylight at any junction
- Adjacent shingle, underlayment and roof condition
- Crown, cap and masonry condition near the flashing area
Interior evaluation may include:
- Stain patterns and water-travel direction
- Moisture on framing, sheathing or insulation (when accessible)
- Evidence of previous water entry
Step 3
Identify the Failure Points
Evaluation findings determine:
- Which flashing components have failed
- Whether sealant, metal, masonry anchoring or multiple elements are involved
- Whether the failure is localized or system-wide
- Whether the crown, cap, masonry or roofing is also contributing
- Whether the chimney cricket is missing, damaged or undersized
Step 4
Recommend the Repair Scope
The recommended scope addresses the confirmed failure points:
- Sealant replacement
- Counter-flashing re-seating or replacement
- Step-flashing repair or replacement
- Full flashing system replacement
- Cricket installation or repair
- Masonry repointing at the flashing line
- Crown, cap or masonry repair when related
- Waterproofing after structural repairs
- Roofing coordination when applicable
Step 5
Complete the Repair
Flashing repairs are carried out using materials and methods appropriate for the chimney, roof type and Minnesota climate. Proper overlap, integration, sealant selection and curing time are observed.
Step 6
Review and Confirm
After repair, the flashing system is reviewed to confirm that the identified failure points have been addressed. The homeowner is informed of any additional conditions observed during the work and whether ongoing monitoring, waterproofing or related service should be considered.
Flashing Repair vs Flashing Replacement
Homeowners often ask whether flashing can be repaired or must be replaced. The answer depends on the type and extent of failure.
| Condition | Likely Appropriate Response |
|---|---|
| Sealant failure only | Sealant replacement — if metal and connections are sound |
| Localized counter-flashing separation | Re-seat, re-secure and re-seal the affected section |
| One or two shifted step-flashing pieces | Replace the affected pieces and re-integrate with shingles |
| Widespread sealant failure and metal corrosion | Full flashing replacement is more cost-effective than patchwork repairs |
| Storm damage bending or displacing flashing | Evaluate extent; localized repair or full replacement depending on damage |
| Flashing from a previous roofing job that was never properly replaced | Full replacement and proper integration with existing roofing |
| Metal perforation or extensive rust | Replacement — corroded metal cannot be sealed effectively |
| Roof replacement underway | Full flashing replacement coordinated with the roofing project |
| Multiple failed sealant repairs over time | Full replacement rather than another temporary seal |
General guidance: If the flashing has been re-sealed multiple times, if metal is corroded, if step flashing has shifted broadly, or if the system is older than the current roof — replacement is usually more effective and longer-lasting than continued patching.
Minnesota Conditions and Chimney Flashing
Minnesota’s climate is one of the most destructive environments for chimney flashing in the country.
The seasonal flashing stress cycle
- Summer: UV radiation degrades sealant; thermal expansion stresses metal joints
- Fall: Temperature drops accelerate sealant hardening; rain tests the system before winter
- Early winter: Snow accumulates against the chimney and over flashing; initial freeze cycles stress joints
- Mid-winter: Ice dams may form at the chimney base; freeze-thaw cycling cracks hardened sealant; wind-driven snow enters gaps
- Late winter / spring: Major snow melt and thaw events produce sustained water contact; ice-dam melt forces water behind flashing
- Spring: Rain returns to a flashing system weakened by winter stress; stains may appear for the first time or worsen
Each season damages the system from a different angle. By the time a homeowner notices interior symptoms, the flashing may have been gradually failing through multiple seasons.
Other Chimney Services
Explore the full range of Chimney Crickets services for Minnesota homeowners:
🔍 Chimney Inspections — Start with a professional evaluation before any repair
🧱 Chimney Repointing — Restore deteriorated mortar joints in Minnesota masonry
👑 Chimney Crown Repair — Seal or rebuild a cracked or damaged chimney crown
🔩 Chimney Flashing Repair — Stop water entry at the roof-chimney junction
💧 Chimney Leak Repair — Trace and resolve active moisture entry
🛡️ Chimney Waterproofing — Protect repaired masonry from future moisture damage
🏗️ Full Masonry Repair — Comprehensive brick and mortar restoration
Important Safety Information
Chimney flashing repair typically involves roof access and does not usually require stopping fireplace use. However, stop using the fireplace and request professional evaluation if:
- Significant water is actively entering the firebox
- Water is in contact with electrical components
- Smoke enters the living area
- A carbon monoxide alarm activates
- The chimney structure appears unstable
- Masonry or flashing components appear ready to fall
If there is an immediate safety threat, active fire, gas leak or carbon monoxide emergency, leave the affected area and call emergency services.
Roof safety
Chimney flashing evaluation and repair require safe roof access. Homeowners should not attempt to evaluate or repair chimney flashing from a roof without appropriate safety equipment, training and fall-protection measures. Professional evaluation is recommended.
Chimney Flashing Repair in Minnesota Homeowners Can Request From Chimney Crickets
Chimney Crickets helps Minnesota homeowners understand accessible chimney and fireplace conditions and determine an appropriate next step.
The company’s approach connects inspection findings with condition-based service recommendations. Depending on what is identified, the appropriate next step may involve cleaning, maintenance, repair, moisture protection or additional evaluation.
For a professional chimney flashing repair in Minnesota homeowners can request for a chimney or fireplace concern, contact Chimney Crickets.
Chimney Crickets
2012 W 98th St
Bloomington, MN 55431
(612) 280-2467
MinneapolisBloomingtonBurnsvilleEaganApple ValleySavageShakopeePrior LakeLakeville
📍 View more Areas → Not sure if we serve your area? Call (612) 280-2467 to confirm.
Chimney Flashing Repair FAQs — Minnesota Homeowners
What is chimney flashing repair?
Chimney flashing repair is the professional process of evaluating and correcting the metal and sealant system that waterproofs the junction where the chimney passes through the roof. It addresses separated, corroded, cracked, displaced or failed flashing components to prevent water from entering the building.
What is chimney flashing?
Chimney flashing is the multi-component system of metal pieces (step flashing, counter flashing, base flashing) and sealant that creates a watertight seal where the chimney penetrates the roof. It directs water onto the roof surface rather than allowing it into the gap between the chimney and the roof structure.
When should I request chimney flashing repair?
Request evaluation when you notice ceiling or wall stains near the chimney, visible rust or separation on flashing metal, gaps at the chimney-roof junction, failed sealant, leaks during wind-driven rain or snow melt, or when recent roofing work did not include flashing evaluation.
What commonly causes chimney flashing to fail?
Common causes include sealant deterioration, thermal expansion and contraction, metal corrosion, ice and snow stress, wind damage, improper original installation, roofing replacement without flashing replacement, masonry deterioration beneath the counter flashing, chimney settlement and age.
Can Minnesota weather damage chimney flashing?
Yes. Minnesota’s freeze-thaw cycling, temperature extremes, ice dams, snow accumulation, wind-driven rain and UV radiation place some of the most aggressive demands on chimney flashing systems in the country.
Is a chimney flashing leak the same as a roof leak?
Not necessarily. Water staining near the chimney may originate from the chimney flashing, the crown, the cap, the masonry, the roof itself or the connection between the chimney and the roof. Accurate diagnosis determines whether the flashing, the roof or both need repair.
Will the flashing be inspected before repair?
Yes. The entire flashing system — counter flashing, step flashing, base flashing, sealant, masonry joints and adjacent roofing — should be evaluated from an appropriate access point before the repair method is selected.
Can chimney flashing be repaired or does it need full replacement?
It depends on the extent of failure. Sealant-only failure may be corrected with re-sealing. Localized separation may be repaired. Widespread corrosion, extensive separation, storm damage, repeated failed repairs or aged systems typically require full replacement.
What is step flashing and counter flashing?
Step flashing consists of individual L-shaped metal pieces woven into shingle courses along the chimney sides. Counter flashing is a continuous or sectioned metal piece embedded in the chimney masonry that folds down over the step flashing to prevent water from getting behind it.
What is a chimney cricket?
A chimney cricket (also called a saddle) is a small peaked structure on the uphill side of the chimney that diverts water and debris around the chimney rather than allowing accumulation at the base. Missing or damaged crickets increase leak risk.
Can flashing be repaired without affecting the roof?
Minor sealant replacement and counter-flashing repair may not require disturbing shingles. Step-flashing repair or replacement typically requires lifting adjacent shingles. Full flashing replacement involves more extensive integration with the roofing.
Should flashing be replaced when the roof is replaced?
Yes — or at minimum, thoroughly evaluated. Coordinating flashing replacement with a roofing project is the most effective and least disruptive approach. Reusing old flashing with new shingles is a common source of subsequent leaks.
Can I seal chimney flashing myself with caulk?
Applying caulk over failed flashing may provide temporary water diversion but does not address the underlying failure. Consumer-grade caulk may not bond properly, may trap moisture and may fail quickly under Minnesota’s thermal-cycling and freeze-thaw conditions. Professional evaluation and appropriate sealant selection are recommended.
Can chimney flashing repair stop a chimney leak?
If the water is entering specifically through failed flashing, proper repair or replacement should stop the leak at that entry point. However, chimney leaks frequently involve more than one source — the crown, cap, masonry and flashing should all be evaluated.
How long does chimney flashing repair take?
Duration depends on the scope. Sealant replacement may be completed in a single visit. Counter-flashing repair or partial step-flashing replacement may also be same-day work. Full flashing replacement, cricket installation or multi-component repairs may require additional time.
How long should chimney flashing last in Minnesota?
Lifespan depends on the material, installation quality, sealant type and Minnesota weather exposure. Copper flashing may last decades. Galvanized steel and aluminum may require attention sooner. Sealant typically needs maintenance or replacement before the metal itself fails.
Does chimney flashing repair require a permit?
Routine flashing repair and sealant replacement generally do not require a permit. Full flashing replacement involving structural roofing work may have permit requirements depending on the scope and local jurisdiction.
Is chimney flashing repair only for homes with wood-burning fireplaces?
No. Any chimney that passes through a roof has flashing — regardless of whether it serves a fireplace, furnace, boiler or other appliance. Flashing failure allows water entry into the building regardless of the connected appliance type.
What information should I provide when requesting flashing repair?
Provide the property address, location and timing of water stains or leaks, visible flashing damage, roof type and age, chimney type, recent roofing or chimney work, and whether the property is being purchased or sold.
How do I request chimney flashing repair in Minnesota?
Call Chimney Crickets at (612) 280-2467 or submit the online service-request form. Include your property address, water symptoms, timing of leaks and any visible flashing or chimney damage.